# WSABuilds  [
[ ](https://forum.xda-developers.com/t/wsabuilds-latest-windows-subsystem-for-android-wsa-builds-for-windows-10-and-11-with-magisk-and-google-play-store.4545087/)
### MagiskOnWSA(用于Windows™ 10和11) [
](https://forum.xda-developers.com/t/wsabuilds-latest-windows-subsystem-for-android-wsa-builds-for-windows-10-and-11-with-magisk-and-google-play-store.4545087/)
### MagiskOnWSA(用于Windows™ 10和11) [ ](https://discord.gg/2thee7zzHZ)
#### Windows Subsystem For Android™(WSA)与Google Play服务和(或)Magisk
[](https://ko-fi.com/N4N0K08AC)
](https://discord.gg/2thee7zzHZ)
#### Windows Subsystem For Android™(WSA)与Google Play服务和(或)Magisk
[](https://ko-fi.com/N4N0K08AC)
⚠️ 分支信息 ⚠️
| :exclamation: **重要的是** `⚠️请勿分支⚠️` |
|------------------------------------------------------------------------|
|**本存储库特别设计为不可被分支。MagiskOnWSA以及一些在该平台上涌现的分支和克隆版(**潜在地**)违反了GitHub的服务条款,由于滥用GitHub Actions已被最终警告、禁用或封禁。**|
|**我们想说一件事情:我们尊重Github向其用户设定的条款和条件。MagiskOnWSA构建是使用MagiskOnWSALocal脚本构建的,在Windows 10构建的情况下进行了修补,并上传到Github上,因此不依赖于Github Actions的使用。**|
|**因此,除非您是开发人员并希望修改代码本身和/或想为该Github存储库做出贡献,否则请不要分支此存储库。**|
## Language/语言
- [中文](README_CN.md)
- [English](README.md)
- Want to contribute to the translation of this repo, feel free to open a pull request./如果您想为该版本的翻译工作做出贡献,请随时打开一个拉动请求。
## 下载
ℹ️下载免责声明
> **Warning**
> ### :exclamation: **重要提示:**
> ### Windows™ 11上的预编译Windows子系统For Android™构建版本在 [Releases](https://github.com/MustardChef/WSABuilds/releases) 在运行MagiskOnWSA脚本和上传到Github之前和之后没有进行任何修改。
> ### Windows™ 10上的预编译Windows子系统For Android™构建版本在 [Releases](https://github.com/MustardChef/WSABuilds/releases) 仅在上传到Github之前根据WSAPatch指南修补了AppxManifest.xml、icu.dll和WsaPatch.dll。
> ### 由于对安全性、透明度和构建完整性的普遍关注,我将很快转向更透明的MagiskOnWSA构建方法
> #### 与从互联网下载的任何其他程序一样,应对Windows子系统For Android™构建版本进行同样程度的审查
❓想要构建您自己的WSA定制版本❓
| :exclamation: **重要的是** `⚠️请勿分支⚠️` |
|------------------------------------------------------------------------|
|**本存储库特别设计为不可被分支。MagiskOnWSA以及一些在该平台上涌现的分支和克隆版(**潜在地**)违反了GitHub的服务条款,由于滥用GitHub Actions已被最终警告、禁用或封禁。**|
|**我们想说一件事情:我们尊重Github向其用户设定的条款和条件。MagiskOnWSA构建是使用MagiskOnWSALocal脚本构建的,在Windows 10构建的情况下进行了修补,并上传到Github上,因此不依赖于Github Actions的使用。**|
|**因此,除非您是开发人员并希望修改代码本身和/或想为该Github存储库做出贡献,否则请不要分支此存储库。**|
|**如果您想创建自己的定制构建,请严格按照明确设定的指示操作,以避免由于分支过多而导致Github Actions滥用,从而导致存储库被下架。**|
---
#### **1. 首先从[Releases](https://github.com/MustardChef/WSABuilds/releases)中检查版本。如果没有你想要的版本,请继续按照本指南操作。如果有,那么请使用那些预构建的WSA版本。**
---
#### **2. 登录你的 Github 账户(这是必要的),在首页上点击如下按钮并选择 “导入仓库”,或者直接前往[此页面](https://github.com/new/import)**
***第一步:***
 ***第二步:***

---
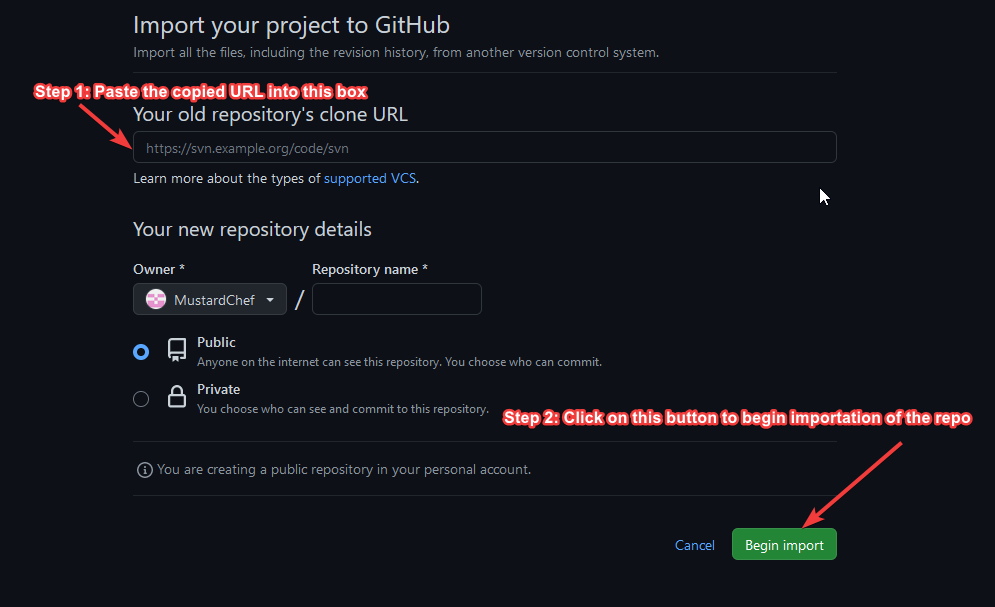
#### **3. [复制此仓库的 URL](https://github.com/WellCodeIsDelicious/WSA-Script),将其粘贴到下面的文本框中,然后点击“导入”**
---
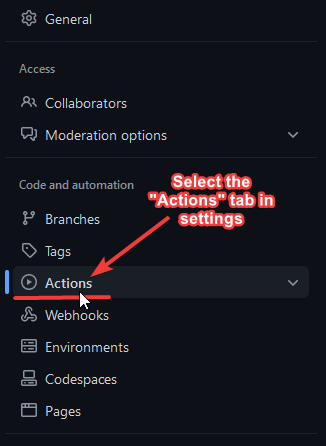
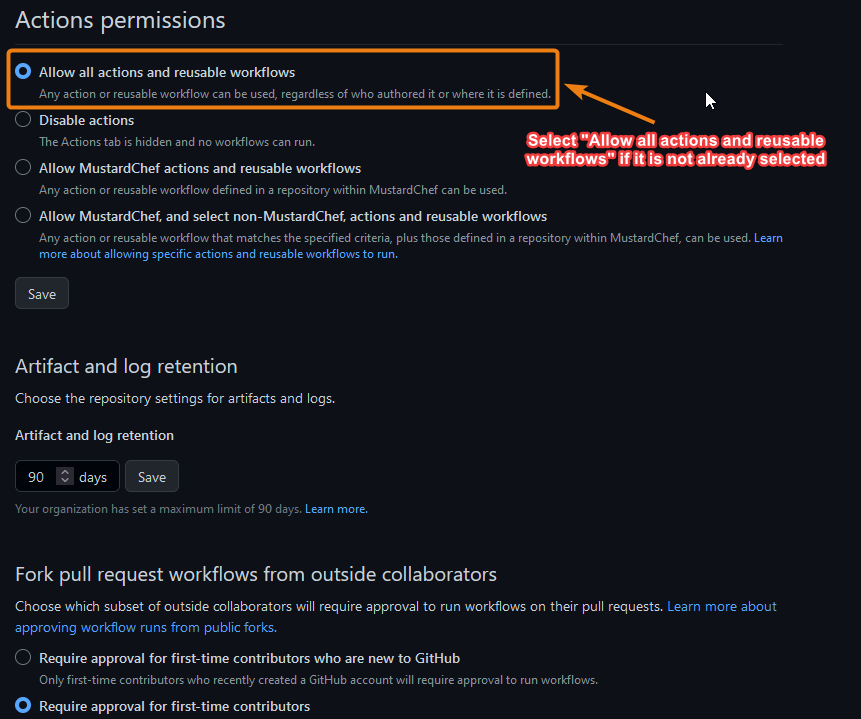
#### **4. 进入新导入的仓库的“设置”选项卡,启用 “Github Actions”**
---
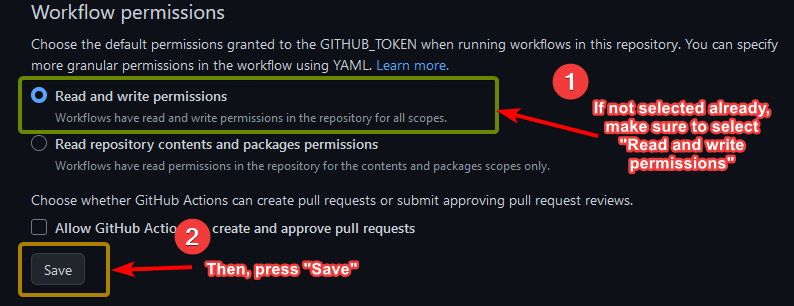
#### **5. 然后向下滚动,直到找到标题为 “工作流权限” 的部分,并按照下图所示的步骤操作**
---
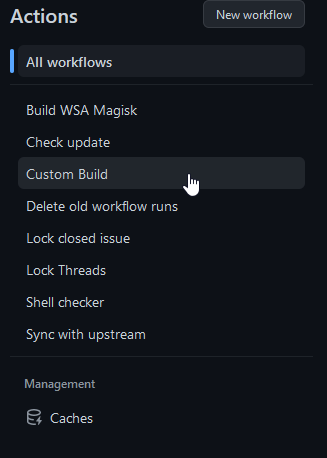
#### **6. 现在,前往“操作”选项卡**

---
#### **7. 在左侧边栏中,点击“Custom Build”工作流程。**
---
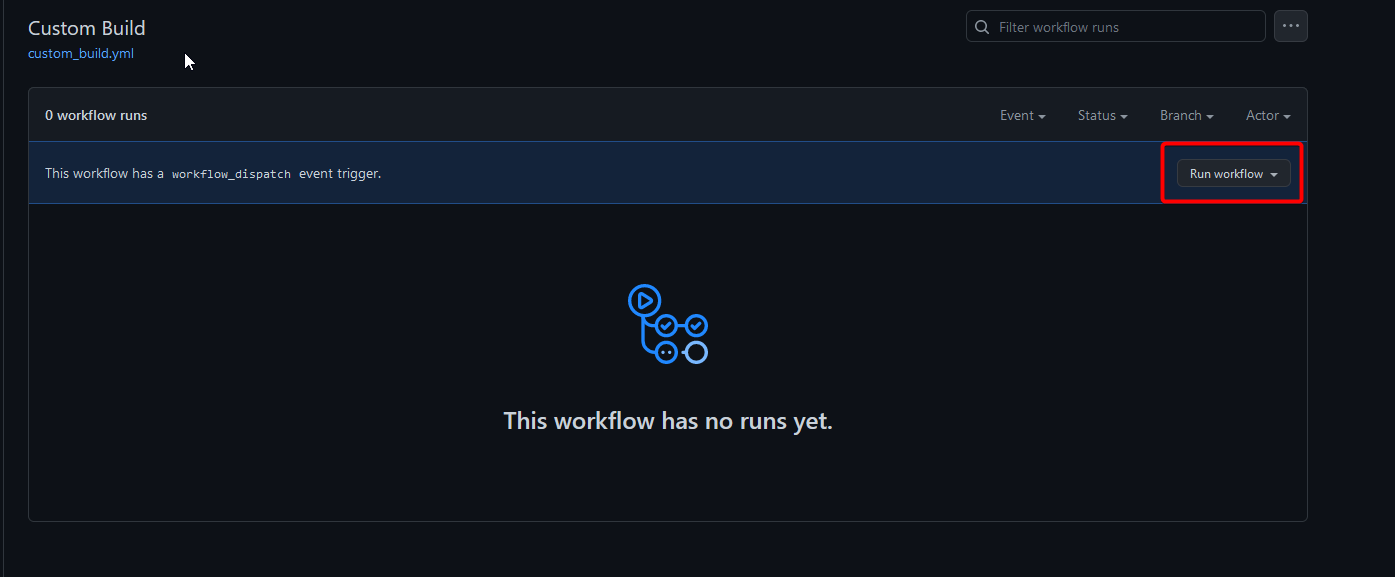
#### **8. Above the list of workflow runs, select **Run workflow****
---
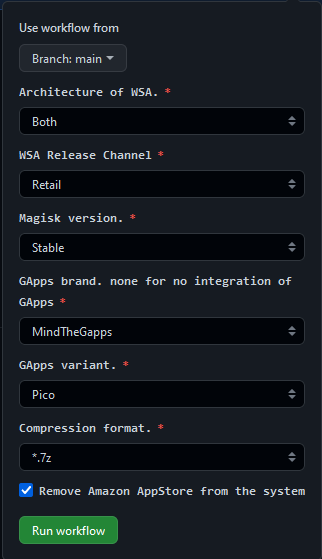
#### **9. 选择您想要的选项,***Magisk 版本***, ***WSA 发布频道 + WSA 架构*** , ***GApps 变体*** 和 ***压缩格式***,然后单击 **Run workflow** 运行工作流**
---
#### **10. 等待操作完成并下载生成物件**
**请勿通过多线程下载器(如 IDM)下载**

---
#### **11. 按照该代码库中的说明进行正常安装 最重要的是....
***第二步:***

---
#### **3. [复制此仓库的 URL](https://github.com/WellCodeIsDelicious/WSA-Script),将其粘贴到下面的文本框中,然后点击“导入”**

---
#### **4. 进入新导入的仓库的“设置”选项卡,启用 “Github Actions”**


---
#### **5. 然后向下滚动,直到找到标题为 “工作流权限” 的部分,并按照下图所示的步骤操作**

---
#### **6. 现在,前往“操作”选项卡**

---
#### **7. 在左侧边栏中,点击“Custom Build”工作流程。**

---
#### **8. Above the list of workflow runs, select **Run workflow****

---
#### **9. 选择您想要的选项,***Magisk 版本***, ***WSA 发布频道 + WSA 架构*** , ***GApps 变体*** 和 ***压缩格式***,然后单击 **Run workflow** 运行工作流**

---
#### **10. 等待操作完成并下载生成物件**
**请勿通过多线程下载器(如 IDM)下载**

---
#### **11. 按照该代码库中的说明进行正常安装 最重要的是....
### **享受吧!**
---
❓可以请求以下版本:❓
> **Note**
>
To request:
> - 更新版本的构建
> - 带 Magisk(root)或 GApps(Google Play 服务)的构建
> 请随意在 [Issues 页面](https://github.com/MustardChef/WSABuilds/issues)上开启一个 issue 进行请求).
请求的自定义构建可以在下面的 “自定义构建” 部分中找到。
|****操作系统****|****下载页面****|****下载镜子****|
|----------|-----------|--------------|
| | [
| [ ](https://github.com/MustardChef/WSABuilds/releases/tag/Windows_11_2303.40000.2.0)
[ ](https://github.com/MustardChef/WSABuilds/releases/tag/Windows_11_2303.40000.2.0_arm64)|[
 ](https://x6cgr-my.sharepoint.com/:f:/g/personal/mcdt_x6cgr_onmicrosoft_com/EpU5MZpnqGlMopVKP_kgmSwBiUCiDquTdoo-OT5gVtTZxA?e=MTEeNP)|
|
](https://x6cgr-my.sharepoint.com/:f:/g/personal/mcdt_x6cgr_onmicrosoft_com/EpU5MZpnqGlMopVKP_kgmSwBiUCiDquTdoo-OT5gVtTZxA?e=MTEeNP)|
| | [
| [ ](https://github.com/MustardChef/WSABuilds/releases/tag/Windows_10_2303.40000.2.0)|[](https://x6cgr-my.sharepoint.com/:f:/g/personal/mcdt_x6cgr_onmicrosoft_com/EgXKX2ptTFVEhJXIxH-ij1EBq3CYnOxUZp0PdE-fFyrc6g?e=0LM1Ml)|
|
](https://github.com/MustardChef/WSABuilds/releases/tag/Windows_10_2303.40000.2.0)|[](https://x6cgr-my.sharepoint.com/:f:/g/personal/mcdt_x6cgr_onmicrosoft_com/EgXKX2ptTFVEhJXIxH-ij1EBq3CYnOxUZp0PdE-fFyrc6g?e=0LM1Ml)|
| 
|[ ](https://github.com/MustardChef/WSABuilds/blob/master/OldBuilds.md)|[](https://x6cgr-my.sharepoint.com/:f:/g/personal/mcdt_x6cgr_onmicrosoft_com/EgNsfSstHBtIuAZgiNVkanYBTwu0kKVC_QvOiW7i0IojdQ)|
|
](https://github.com/MustardChef/WSABuilds/blob/master/OldBuilds.md)|[](https://x6cgr-my.sharepoint.com/:f:/g/personal/mcdt_x6cgr_onmicrosoft_com/EgNsfSstHBtIuAZgiNVkanYBTwu0kKVC_QvOiW7i0IojdQ)|
|
| 自定义构建: [ ](https://github.com/MustardChef/WSAMagiskDelta)| |
|
](https://github.com/MustardChef/WSAMagiskDelta)| |
|

|[ ](https://github.com/MustardChef/WSAPackages)|[](https://x6cgr-my.sharepoint.com/:f:/g/personal/mcdt_x6cgr_onmicrosoft_com/EgSWYr5JLjFNkSmNydPNFKsBJAlCKj61c6BbbbVGPglASA?e=weIk7y)|
## 要求
| | |
|-----------------------|-----------------------|
| - RAM:6 GB(不推荐),8 GB(最低要求)和16 GB(推荐)。|- RAM:6 GB(不推荐),8 GB(最低要求)和16 GB(推荐)。|
|- 处理器:您的 PC 应满足基本的 Windows™ 11 要求,即 Core i3 第 8 代、Ryzen 3000、Snapdragon 8c 或更高版本。| - 处理器:N/A 这有点难以预测,但强烈建议您的处理器列在[支持的 CPU 列表](https://learn.microsoft.com/en-gb/windows-hardware/design/minimum/windows-processor-requirements)中,以满足 Windows 11 的要求。|
|- 处理器类型:x64 或 ARM64。|- 处理器类型:x64 或 ARM64。|
|- GPU:任何兼容的 Intel、AMD 或 Nvidia GPU
](https://github.com/MustardChef/WSAPackages)|[](https://x6cgr-my.sharepoint.com/:f:/g/personal/mcdt_x6cgr_onmicrosoft_com/EgSWYr5JLjFNkSmNydPNFKsBJAlCKj61c6BbbbVGPglASA?e=weIk7y)|
## 要求
| | |
|-----------------------|-----------------------|
| - RAM:6 GB(不推荐),8 GB(最低要求)和16 GB(推荐)。|- RAM:6 GB(不推荐),8 GB(最低要求)和16 GB(推荐)。|
|- 处理器:您的 PC 应满足基本的 Windows™ 11 要求,即 Core i3 第 8 代、Ryzen 3000、Snapdragon 8c 或更高版本。| - 处理器:N/A 这有点难以预测,但强烈建议您的处理器列在[支持的 CPU 列表](https://learn.microsoft.com/en-gb/windows-hardware/design/minimum/windows-processor-requirements)中,以满足 Windows 11 的要求。|
|- 处理器类型:x64 或 ARM64。|- 处理器类型:x64 或 ARM64。|
|- GPU:任何兼容的 Intel、AMD 或 Nvidia GPU
GPU 性能可能会因其与 Windows Subsystem For Android™ 的兼容性而有所不同
使用 Intel HD Graphics 530 及更早版本的用户
当使用 Intel HD Graphics 530 及更早版本的集成显卡时,WSA 可能无法启动或出现图形故障。这是一个已知问题,但目前没有我知道的解决方法,此外,这些 GPU 太旧,不符合 Windows 11 的要求,因此不受官方支持。 [按照此指南](https://github.com/MustardChef/WSABuilds/blob/master/Guides/ChangingGPU.md) 切换到另一个集成显卡/独立显卡/外置显卡,或使用 Microsoft Basic Renderer
使用 Nvidia GPU 的用户
已知 Nvidia GPU 会引起问题。如果 Windows Subsystem For Android™ 在使用 Nvidia GPU 时无法启动或出现图形故障,请 [按照此指南](https://github.com/MustardChef/WSABuilds/blob/master/Guides/ChangingGPU.md) 切换到另一个集成显卡/独立显卡/外置显卡,或使用 Microsoft Basic Renderer
此可选设置用于虚拟化,您可以从控制面板/可选功能启用此设置。|- 虚拟机平台已启用:
此可选设置用于虚拟化,您可以从控制面板/可选功能启用此设置。|
|- 存储:固态硬盘(SSD)
- 磁盘驱动器(HDD)(不建议使用)。|- 存储:固态硬盘(SSD)
- 磁盘驱动器(HDD)(不建议使用)。|
|- 分区:NTFS
Windows Subsystem For Android™ 仅能安装在 NTFS 分区上,而不能安装在 exFAT 分区上。|- 分区:NTFS
Windows Subsystem For Android™ 仅能安装在 NTFS 分区上,而不能安装在 exFAT 分区上。|
|- Windows™ 11:Build 22000.526 或更高版本。|- Windows™ 10:22H2 10.0.19045.2311 或更高版本。
从此版本库的 WSA 版本 2301.40000.7.0 及更高版本开始,对 Windows™ 10:20H1 10.0.19041.264 或更高版本提供非官方支持,因此您必须安装 [KB5014032](https://www.catalog.update.microsoft.com/Search.aspx?q=KB5014032),然后安装 [KB5022834](https://www.catalog.update.microsoft.com/Search.aspx?q=KB5022834) 才能在这些旧版 Windows 上使用 WSA。
|
|- 计算机必须支持虚拟化,并在 BIOS/UEFI 和可选功能中启用。[指南](https://support.microsoft.com/zh-cn/windows/%E5%9C%A8-windows-11-pc-%E4%B8%8A%E5%90%AF%E7%94%A8%E8%99%9A%E6%8B%9F%E5%8C%96-c5578302-6e43-4b4b-a449-8ced115f58e1)|- 计算机必须支持虚拟化,并在 BIOS/UEFI 和可选功能中启用。[指南](https://support.microsoft.com/zh-cn/windows/%E5%9C%A8-windows-11-pc-%E4%B8%8A%E5%90%AF%E7%94%A8%E8%99%9A%E6%8B%9F%E5%8C%96-c5578302-6e43-4b4b-a449-8ced115f58e1)|

安装
> **Note** :
> 如果你已经安装了官方的Windows子系统for Android™,则必须完全卸载它才能使用MagiskOnWSA。
> 如果你想保留之前安装(官方或MagiskOnWSA)的数据,可以在卸载之前备份%LOCALAPPDATA%\Packages\MicrosoftCorporationII.WindowsSubsystemForAndroid_8wekyb3d8bbwe\LocalCache\userdata.vhdx,然后在安装后恢复它。
1. 进入[Releases页面](https://github.com/MustardChef/WSABuilds/releases/latest)
2. 在最新的版本中,进入Assets部分,下载你选择的Windows子系统 for Android™版本(不要下载"Source code")
3. 解压缩zip文件
4. 删除zip文件
5. 将新解压缩的文件夹移动到合适的位置(文档文件夹是一个不错的选择),因为你需要在电脑上保留文件夹来使用MagiskOnWSA
> **Note** :
> 如果你正在更新WSA,请在被问及时合并文件夹并替换所有项目的文件时操作。
6. 打开Windows子系统 for Android™文件夹:搜索并双击“Run.bat”
- 如果你之前已经安装了MagiskOnWSA,它将自动卸载之前的版本并保留所有用户数据并安装新版本,所以不要担心你的数据。
- 如果弹出窗口没有请求管理员权限并且Windows子系统 for Android™没有成功安装,则应手动以管理员身份运行Install.ps1:
- 按Win+x并选择Windows™ Terminal (管理员)
- 输入下面的命令并按enter,包括{},将{}中的路径替换为提取的文件夹的路径
```Powershell
cd "{X:\path\to\your\extracted\folder}"
```
- 输入下面的命令并按enter
```Powershell
PowerShell.exe -ExecutionPolicy Bypass -File .\Install.ps1
```
- 脚本将运行,Windows子系统 for Android™将被安装
- 如果此解决方法不起作用,则你的电脑不支持WSA
7. 安装过程完成后,Windows子系统 for Android™将启动(如果这是第一次安装,将显示一个要求同意诊断信息的窗口。有时会显示两个相同的窗口,如果在两个窗口中都单击了OK,不会发生任何不良反应)
8. 点击PowerShell窗口,然后按键盘上的任意键, PowerShell 窗口应该关闭。
9. 关闭文件浏览器。
10. **享受吧!**
### 注意事项(适用于 Windows 10 和 11):
1. 不能删除 Windows Subsystem For Android™ 安装文件夹。
Add-AppxPackage -Register .\AppxManifest.xml 的作用是将 appx 包与一些现有的未打包文件注册,因此只要你想使用 Windows Subsystem For Android™,就必须保留它们。查看 https://learn.microsoft.com/en-us/powershell/module/appx/add-appxpackage?view=windowsserver2022-ps 以获取更多详细信息。
2. 在运行 Windows Subsystem For Android™ 之前,您需要注册您的 Windows Subsystem For Android™ appx 包。对于 [WSABuilds](https://github.com/MustardChef/WSABuilds) 和 [MagiskOnWSALocal](https://github.com/LSPosed/MagiskOnWSALocal) 用户,您需要在提取的目录中运行 Run.bat。如果脚本失败,您可以采取以下诊断步骤(需要管理员权限):
1. 打开 PowerShell 窗口并将工作目录更改为您的 Windows Subsystem For Android™ 目录。
2. 在 PowerShell 中运行以下命令。这应该会失败,并返回一个 ActivityID,这是下一步所需的 UUID。
```Powershell
Add-AppxPackage -ForceApplicationShutdown -ForceUpdateFromAnyVersion -Register .\AppxManifest.xml
```
3. 在 PowerShell 中运行以下命令。这应该会打印失败操作的日志。
```Powershell
Get-AppPackageLog -ActivityID
```
4. 检查日志以查找失败的原因并修复它。

更新
### 如何在不丢失任何应用程序和数据的情况下更新Android的Windows Subsystem(WSA)?
1. [下载最新版本](https://github.com/MustardChef/WSABuilds#downloads)(您想要更新到的版本)
2. 确保 Windows 子系统 For Android 没有运行(在 WSA 设置中单击 “关闭” 并等待旋转加载器消失)
3. 使用 7-Zip、WinRAR 或任何其他工具打开 .zip 文件
4. 在 .zip 存档文件中打开子文件夹(示例:WSA_2xxx.xxxxx.xx.x_xx_Release-Nightly-with-magisk-xxxxxxx-MindTheGapps-xx.x-RemovedAmazon)
5. 选择此子文件夹中的所有文件,并将它们提取到当前文件夹,其中包含 Windows 子系统 For Android 的文件(您提取并安装 WSA 的文件夹)
6.在提示替换文件夹时,选择“对所有当前项目执行此操作”,然后单击 “是”
7.在提示替换文件时,单击 “替换目标中的文件”
8. 运行 ``Run.bat`` 文件
9. 启动 Windows 子系统 For Android 设置应用,并使用侧边栏转到“关于”选项卡
10. 检查 WSA 版本是否与您要更新到的最新版本/版本号匹配
**J如果遇到任何困难,请加入 Discord**

卸载
### 新 CLI 和 GUI 卸载工具即将推出!加入 Discord 获取公告和更新。
> **Note**:
>
> 如果你想保存你的数据,请备份 %LOCALAPPDATA%\Packages\MicrosoftCorporationII.WindowsSubsystemForAndroid_8wekyb3d8bbwe\LocalCache\userdata.vhdx 文件。卸载后,将 VHDX 文件复制回 %LOCALAPPDATA%\Package\MicrosoftCorporationII.WindowsSubsystemForAndroid_8wekyb3d8bbwe\LocalCache 文件夹。
- 要移除通过 WSABuild 安装的 WSA:
- **1.)** 确保 Windows 子系统 for Android™ 没有运行
- **2.)** 使用内置的 Windows 搜索或通过“添加和删除程序”搜索“Windows 子系统 for Android™ 设置”,然后按卸载
- **3.)** 删除从中提取并运行 Run.bat 以安装 WSA(MagiskOnWSA 文件夹)的 WSA 文件夹
- **4.)** 转到 ``%LOCALAPPDATA%/Packages/``,并删除名为``MicrosoftCorporationII.WindowsSubsystemForAndroid_8wekyb3d8bbwe`` 的文件夹
- 如果出现文件无法删除的错误,请确保 WSA 已关闭
- 要删除从 Microsoft Store 安装的 WSA:
- **1.)** 使用内置的 Windows 搜索或通过“添加和删除程序”搜索“Windows 子系统 for Android™ 设置”,然后按卸载

常见问题
**帮助我,我在使用MagiskOnWSA构建时遇到了问题**
- 在[Github](https://github.com/MustardChef/WSABuilds/issues)中打开一个问题或[加入Discord](https://github.com/MustardChef/WSABuilds#join-the-discord),并描述问题的细节
**帮助我,我在安装Windows™ 10上的Android™子系统时遇到问题**
- 我不在修补程序上工作,也不声称。在Discord或Github中打开一个问题,如果可能,我将尝试协助您解决问题。如需完整支持,请访问项目主页并在那里打开问题:https://github.com/cinit/WSAPatch/issues/
**如何获取logcat?**
- 有两种方法:
```
adb logcat
```
或者
- Windows中的位置 --->
`%LOCALAPPDATA%\Packages\MicrosoftCorporationII.WindowsSubsystemForAndroid_8wekyb3d8bbwe\LocalState\diagnostics\logcat`
**我可以删除安装的文件夹吗?**
- 不可以。
**如何将Windows™ 10上的Android™子系统更新到新版本?**
- 如[安装说明](#installation)所述。下载[最新的Windows™ 10上的Android™子系统版本](#downloads)并替换先前安装的内容,然后重新运行Install.ps1。不用担心,您的数据将被保留。
**如何更新Magisk?**
- 执行与更新Windows™ 10上的Android™子系统相同的操作。等待包含更新版本Magisk的新MagiskOnWSA版本发布,然后按照[安装说明](#installation)进行更新。
**我可以通过SafetyNet/Play Integrity吗?**
- 不可以。像Windows™ 10上的Android™子系统这样的虚拟机无法通过这些机制,因为缺乏Google的签名。要通过需要更多异国情调的(和未经测试的)解决方案,例如: https://github.com/kdrag0n/safetynet-fix/discussions/145#discussioncomment-2170917
**什么是虚拟化?**
- 虚拟化是运行Windows™ 10上的Android™子系统等虚拟机所必需的。`Run.bat` 可帮助您启用它。重启后,请重新运行 `Run.bat` 以安装Windows™ 10上的Android™子系统。如果仍然不起作用,则必须在您的BIOS/UEFI中启用虚拟化。说明因PC厂商而异,请在网上寻求帮助。
**我可以重新安装为读写模式挂载系统分区吗?**
- 不可以。Windows™ 10上的Android™子系统由Hyper-V以只读方式挂载。但是,您可以通过创建Magisk模块或直接修改system.img文件来修改系统分区。
**我无法adb connect localhost:58526**
- 确保开发者模式被启用。如果问题仍然存在,请在 "设置"--->"开发人员 "页面上检查Windows Subsystem For Android™的IP地址,并尝试:
```
adb connect ip:5555
```
**Magisk 在线模块列表为空?**
- Magisk 主动删除了在线模块仓库。您可以在本地安装模块,或按以下步骤操作:
**步骤 1**
adb push module.zip /data/local/tmp
**步骤 2**
adb shell su -c magisk --install-module /data/local/tmp/module.zip
**M如何卸载 Magisk?**
- 通过 [Issues](https://github.com/MustardChef/WSABuilds/issues) 请求一个不包含 Magisk 的 Windows Subsystem For Android™ 版本,从 [Releases page](https://github.com/MustardChef/WSABuilds/releases/latest) 下载该版本,然后按照 [安装说明](https://chat.openai.com/chat/5fb54c37-8eff-4f09-8bb2-dd53e5c9e24e#installation) 进行安装。
**可以在 OpenGApps 和 MindTheGapps 之间切换吗?**
- 不行。在切换之前,请先进行 [完全卸载](#uninstallation)。
**How do I install custom Magisk or GApps?**
- 如果要请求一个包含自定义的 Magisk 或 GApps 的版本,请在 [Issues page](https://github.com/MustardChef/WSABuilds/issues.) 上打开一个 issue。您也可以使用 [MagiskOnWSALocal](https://github.com/LSPosed/MagiskOnWSALocal) 脚本,并按照仓库中提供的说明进行操作。

使用指南
### GPU Guide:
[ ](https://github.com/MustardChef/WSABuilds/blob/master/Guides/ChangingGPU_CN.md)
### Sideload Guide:
[
](https://github.com/MustardChef/WSABuilds/blob/master/Guides/ChangingGPU_CN.md)
### Sideload Guide:
[ ](https://github.com/MustardChef/WSABuilds/blob/master/Guides/Sideloading_CN.md)
### Moving WSA to another drive or partition:
[
](https://github.com/MustardChef/WSABuilds/blob/master/Guides/Sideloading_CN.md)
### Moving WSA to another drive or partition:
[ ](https://github.com/MustardChef/WSABuilds/blob/master/Guides/MoveToExtDrive_CN.md)
### Installing KernelSU
[
](https://github.com/MustardChef/WSABuilds/blob/master/Guides/MoveToExtDrive_CN.md)
### Installing KernelSU
[ ](https://github.com/MustardChef/WSABuilds/blob/master/Guides/KernelSU_CN.md)
### Installing BusyBox
[
](https://github.com/MustardChef/WSABuilds/blob/master/Guides/KernelSU_CN.md)
### Installing BusyBox
[ ](https://github.com/MustardChef/WSABuilds/blob/master/Guides/BusyBox_CN.md)

有问题吗?
### Common Issues:
[ ](https://github.com/MustardChef/WSABuilds/blob/master/Fixes/FixInstallps1_CN.md)
[
](https://github.com/MustardChef/WSABuilds/blob/master/Fixes/FixInstallps1_CN.md)
[ ](https://github.com/MustardChef/WSABuilds/blob/master/Fixes/FixVirtError_CN.md)
[
](https://github.com/MustardChef/WSABuilds/blob/master/Fixes/FixVirtError_CN.md)
[ ](https://github.com/MustardChef/WSABuilds/blob/master/Fixes/FixInternet_CN.md)
[
](https://github.com/MustardChef/WSABuilds/blob/master/Fixes/FixInternet_CN.md)
[ ](https://github.com/MustardChef/WSABuilds/blob/master/Fixes/Fix%20Error%200x80073CFD_CN.md)
[
](https://github.com/MustardChef/WSABuilds/blob/master/Fixes/Fix%20Error%200x80073CFD_CN.md)
[ ](https://github.com/MustardChef/WSABuilds/blob/master/Fixes/Fix%20Error%200x80073CF6_CN.md)
[
](https://github.com/MustardChef/WSABuilds/blob/master/Fixes/Fix%20Error%200x80073CF6_CN.md)
[ ](https://github.com/MustardChef/WSABuilds/blob/master/Fixes/Fix%20Error%200x80073CF9_CN.md)
[
](https://github.com/MustardChef/WSABuilds/blob/master/Fixes/Fix%20Error%200x80073CF9_CN.md)
[ ](https://github.com/MustardChef/WSABuilds/blob/master/Fixes/Fix%20Error%200x80073D10_CN.md)
[
](https://github.com/MustardChef/WSABuilds/blob/master/Fixes/Fix%20Error%200x80073D10_CN.md)
[ ](https://github.com/MustardChef/WSABuilds/blob/master/Fixes/NamedResource%20Not%20Found%20-%20Fix%20Error%200x80073B17_CN.md)
[
](https://github.com/MustardChef/WSABuilds/blob/master/Fixes/NamedResource%20Not%20Found%20-%20Fix%20Error%200x80073B17_CN.md)
[ ](https://github.com/MustardChef/WSABuilds/blob/master/Fixes/FixPathTooLong_CN.md)
[
](https://github.com/MustardChef/WSABuilds/blob/master/Fixes/FixPathTooLong_CN.md)
[ ](https://github.com/MustardChef/WSABuilds/blob/master/Fixes/MissingIcons_CN.md)

贷方
- [Microsoft](https://apps.microsoft.com/store/detail/windows-subsystem-for-android%E2%84%A2-with-amazon-appstore/9P3395VX91NR): For providing Windows Subsystem For Android™ and related files. Windows Subsystem For Android™, Windows Subsystem For Android™ Logo, Windows™ 10 and Windows™ 11 Logos are trademarks of Microsoft Corporation. Microsoft Corporation reserves all rights to these trademarks. By downloading and installing Windows Subsystem For Android™, you agree to the [Terms and Conditions](https://support.microsoft.com/en-gb/windows/microsoft-software-license-terms-microsoft-windows-subsystem-for-android-cf8dfb03-ba62-4daa-b7f3-e2cb18f968ad) and [Privacy Policy](https://privacy.microsoft.com/en-gb/privacystatement)
- [YT-Advanced](https://github.com/YT-Advanced/WSA-Script): For providing and continuing the development of the script made by LSPosed, the Github Action workflow guide is based on his Github Repo. I do not claim his work and the work of the many contributers as my own and nor intend to do so.
- [Cinit and the WSAPatch Guide](https://github.com/cinit/WSAPatch): Many thanks for the comprehensive guide, files and support provided by Cinit and the contributers at the WSAPatch repository. Windows™ 10 Builds in this repo rely on the hard work of this project and hence credit is given where due
- [StoreLib](https://github.com/StoreDev/StoreLib): API for downloading WSA
- [Magisk](https://github.com/topjohnwu/Magisk): The Magic Mask for Android
- [The Open Google Apps Project](https://opengapps.org): Script the automatic generation of up-to-date Google Apps packages
- [WSA-Kernel-SU](https://github.com/LSPosed/WSA-Kernel-SU): A kernel module to provide /system/xbin/su to Android Kernel
- [Kernel Assisted Superuser](https://git.zx2c4.com/kernel-assisted-superuser): Kernel assisted means of gaining a root shell for Android
- [WSAGAScript](https://github.com/ADeltaX/WSAGAScript): The first GApps integration script for WSA
- [MagiskOnWSA](https://github.com/LSPosed/MagiskOnWSA): `Deprecated` Integrate Magisk root and Google Apps into WSA
- [MagiskOnWSALocal](https://github.com/LSPosed/MagiskOnWSALocal): Integrate Magisk root and Google Apps into WSA
***存储库是作为一个实用程序提供的。***
***Android是Google LLC的商标。Windows™是微软公司的商标。***